
Guest post: hand carved rubber stamps
i’m excited to bring you this fantastic diy by katrina alana today – i can’t wait to try it out myself!

Steps:
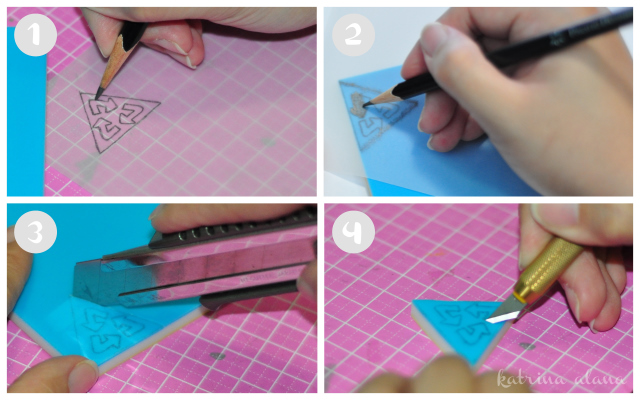
- Draw a design on the tracing paper or download our recycle rubber stamp pattern here.
- Flip the tracing paper so that the design you drew is facing the carving rubber. Go over the design with a pencil to transfer the image.
- Cut the edge of the design using the cutter.
- Cut-out the design using the pen knife making sure that you carve at a 45 degree angle.
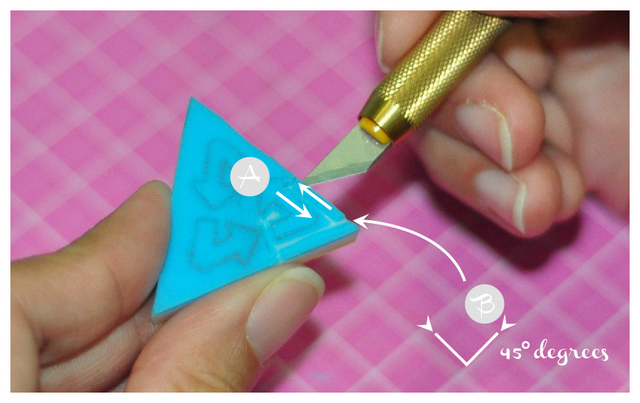
Make sure you cut one section of the design at a time. Cut at a 45 degree angle going one way and cut at a 45 degree angle going the opposite way. You will make a V shape incision. Go over sections of the design until you completely remove the excess rubber.
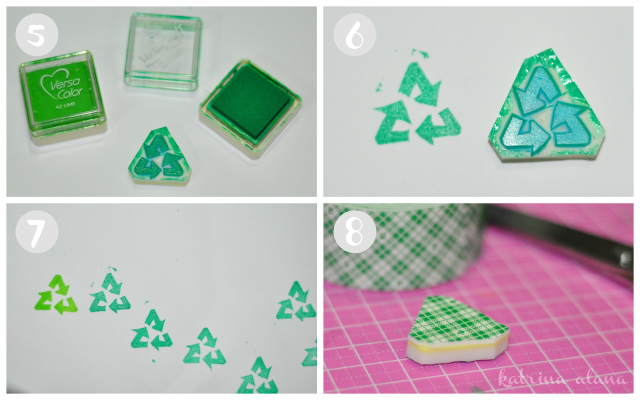
- Ink the carved rubber stamp.
- Make a test impression.
- Carve-out any imperfection and do a test impression until you’re happy with the rubber stamp.
- Stick the mounting tape and remove any excess tape by cutting it off.
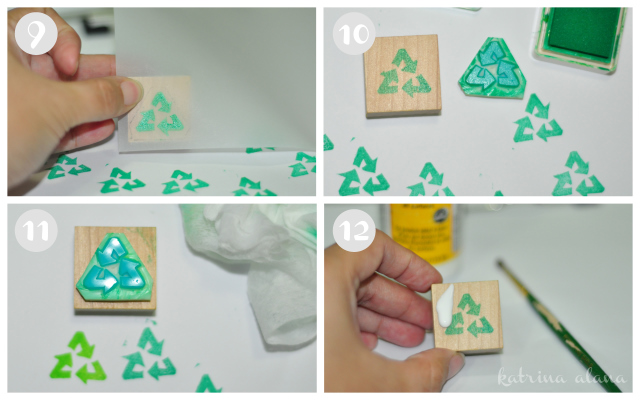
- Stamp the design on tracing paper and trace the outline of the rubber stamp as well. This will allow you to position the stamp on the wooden block properly.
- Once you have an idea on how to position the stamp, stamp on the wooden block.
- Clean the stamp using the baby wipes. Baby wipes are perfect for cleaning used rubber stamps.
- Use glue or Modge Podge and a brush to seal the wooden block.
Hope you enjoyed this tutorial and do let us know if you’ve made your own stamps using this guide.
huge thanks to katrina alana for this post – be sure to go visit their website

9 Comments
Leave a Reply
You must be logged in to post a comment.
Sarah
February 20, 2012 at 13:45I’ve always wanted to try this! Thanks for the great tutorial :)
sylvia@artsyants
February 20, 2012 at 16:07awesome, that looks great. thanks so much for sharing!
Katerina Bon Vora
February 20, 2012 at 16:34cool, thats something to do. :) thanks!!
Queen of Savings
February 20, 2012 at 19:08Stopping by from the Grow your blog {blog Hop}! http://queenofsavings.com
Laserwrite Promotions
March 4, 2012 at 07:59This as a fantastic and so simple way of making stamps,
I cant wait to try it
Block Rubber Stamps
June 12, 2012 at 10:05awesome post, i really like this. Thanks for sharing important blog with us.
watch arrow season 3 online for free
October 6, 2014 at 10:19Sweet blog! I found it while searching on Yahoo News.
Do you have any tips on how to get listed in Yahoo News?
I’ve been trying for a while but I never seem
to get there! Thanks
Wresty Ma
January 18, 2019 at 03:32Sweet! finally some use for my rubber stamps in my garage. lol, gotta try this out. I’m also going to use my old rubber stamp handle, I bought it a year ago from Estamps NZ when I was in Australia. Thanks for sharing!
Wresty Ma
January 18, 2019 at 03:34I meat *rubber pads by the way, those thick ones that can be carved. Anyways thank you!